Showing posts with label Summer in Paris. Show all posts

Wednesday, August 18, 2010

Inked Hot Air Balloon

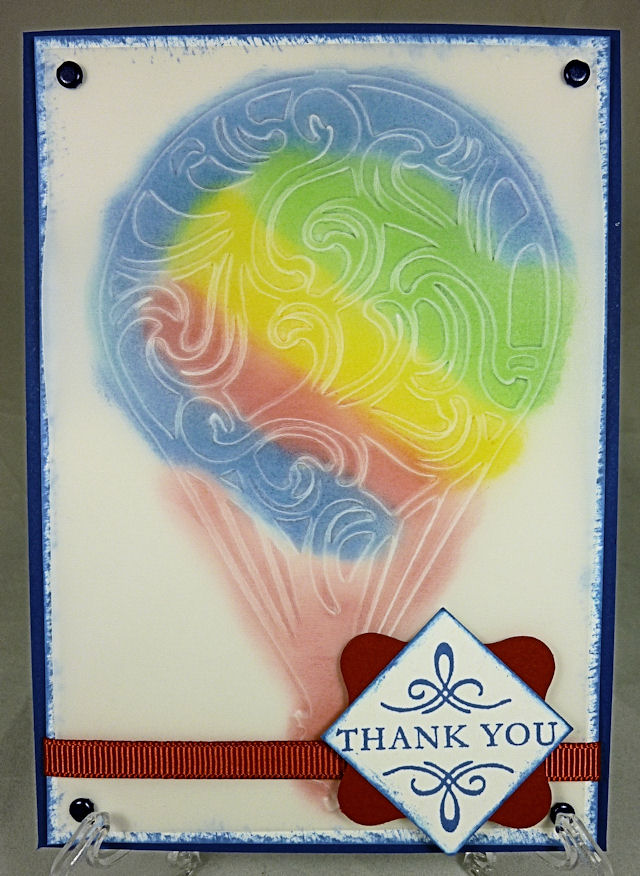
Hi Everyone, Here is another card made with the Cricuts Cuttables Embossing Kit and the hot air balloon image from "Summer in Paris".


I have used vellum card and embossed it with the hot air balloon folder. Using a dauber, I added ink to the back and then adhered it to a white cardstock with brads.


I have added some ribbon and a sentiment for another simple but effective card.

The same technique is used below with a Stampin' Up Sizzix embossing folder. As you can see, the image is slightly sharper, but the overall effect is the same.


Till next time,
Luv, Tereesa

Sunday, August 15, 2010

Modelling with a Hot Air Balloon

Hi Everyone, How are you all going with the Scrappy-Go-Lucky Blog Hop? Have you managed to check out each of the designs? Tomorrow is the last day so make sure you head back over to Scrappy-Go-Lucky to check out the last 2 made by Lisa and Tara. If you have worked out the theme, leave your answer at THIS POST to be in with a chance to win one of the four new cartridges:-

Rock Princess
Winter Frolic
Country Life
Happy Hauntings
 
A few weeks ago, I promised to show you some cards made with the Cricut Cuttables Embossing Kit.
 
 
I used the hot air balloon image from "Summer in Paris".
 
 
First I tried some plain cardstock through the cuttlebug. While the image did work - I found the embossing wasn't as sharp as when used with Cuttlebug or Sizzix folders.


I then tried it with some metallic cardstock. This did work better.


They still made up into great backgrounds on the cards below.


I would use these again, especially for use in something you wish to personalise such as for invitations or wedding stationery. And, as mentioned in the earlier post, I would definitely choose something a little less intricate next time.

I have also used it with a different technique, and will show you this in my next post.

Good luck with the blog hop.

Luv, Tereesa.

Friday, July 16, 2010

Follow Your Heart (To Paris)

Hi, I am currently working on a large invitation order for a 21st, so today I thought I'd share with you one of the DT cards I recently made for Scrappy-Go-Lucky. I have used Summer in Paris - loooove it - all the designs are so pretty and intricate. One of my favourite cuts on this cartridge would be these gorgeous hot-air balloons (imagine them floating past the Eiffel Tower).


The pale plum matt (with distressed edges) and balloon cut is from the Kaiser "Made With Love" collection - it actually has shiny pink hearts that can just be seen among the swirls. The balloons and shadows are all cut at 4".


After adhering the top layer - before the glue dried - I covered the balloons with glitter so it would stick to the edges of the swirls, it looks really pretty.


The sentiment is from Stampin' Up, and is on a pale plum tag with some inking around around the edges. The scalloped layer was embossed using the Cuttlebug "Distressed Stipes" folder.


The dark balloon and sentiment were adhered using foam dots to add dimension.


I then added some organza ribbon to finish. Voila !!

Till next time,
Luv, Tereesa.

Wednesday, June 9, 2010

Layout - In Love

Hi Everyone, Day 3 of our Round the World with CRI-Kits Blog Hop..... I hope you checked out Jane's awesome Disney Layout yesterday, and Diane's Boston Tea Party today for your chance to win a set of the Cri-Kits Gel Pens. And don't forget to check in daily with Scrappy-Go-Lucky for the major prize of the 4 new release cartridges -
Wall Decor & More / Cindy Lou / Freshly Picked / Mini Monsters

Tonight I thought I would show you another layout. I wanted to do something that was simple but elegant to frame and hang on our bedroom wall. The papers I chose are from the Kaiser Gypsy Sisters collection, the colours of which match perfectly with our clothing and bedroom.


This gorgeous cut is from "Tie The Knot". The red heart is a layer that I embossed with the "Kimmy Luvs" cuttlebug folder. I then carefully applied glue to the embossed part and sprinkled with a crimson glitter.


The beautiful piano is from "Summer In Paris" - my favourite cartridge at the moment. The pale lemon layer underneath is the same as the backing sheet, but I inked around the edges with burgandy ink.


The two flourishes are cut from "Stretch Your Imagination" (in differing sizes), and they are topped by beautiful flowers, lace, and a skeleton leaf kindly donated from Tracey's stash (Thank-you Tracey). The wooden flourish is Kaiser which has been inked first with burgandy, then red, then glossy accents applied.


I added just a little paper-piercing, and some pearls in the corners. I have decided to add some of the lovely pearl flourishes that Jane loves using, but haven't yet been able to find any in our local craft stores.


I hope you like it. I will post another photo when it is hanging in its new home.

Don't forget to check out Tracey's blog tomorrow - I am sure it will be amazing.

Till Friday,
Luv, Tereesa.