Hi Friends, I've been MIA recently due to a family illness.
As a few of you may know, my daughter (Alyssa) has been very ill in hospital and still remains there. She is undergoing treatment and we are hopeful she will be home for XMAS.
Thank you to those who have been checking in on her condition regularly and offering support and chatting on the phone. The constant support we have received has been overwhelming, and I would like to thank everyone for their thoughts and prayers.
Luv, Tereesa.

Sunday, December 5, 2010
Wednesday, November 10, 2010
Cherish Every Day
Hi, After holding a stamping class today, I realised I haven't actually done a lot of stamping lately. When Tracey put me onto a new card challenge blog at Scrapbook City, I decided to put this together.

These gorgeous flowers are from the Lite cartridge "Bloom". They're cut at .5" / .6" / 1" / 1.5".

The stamp set and papers are all from Stampin' Up. Isn't this little girl a cutie?


These gorgeous flowers are from the Lite cartridge "Bloom". They're cut at .5" / .6" / 1" / 1.5".

The stamp set and papers are all from Stampin' Up. Isn't this little girl a cutie?

Don't forget to have a look at the new fortnightly "Whip It Up Wednesday" challenge at Scrappy-Go-Lucky. The current challenge finishes in 6 days, and on offer is 6 Ciao Copic Markers of your choice, plus a sheet of Ching-Chou Kuik's Fantasy Art Collection.
Till next time.
Luv, Tereesa.
Saturday, November 6, 2010
Happy Birthday Tracey !!
Hi, Tracey is celebrating her special day today, so I would like to wish her the Happiest of Birthdays! Tracey deserves everything wonderful that life has to offer, and I hope she has a fantastic day.
This is the card I made for her. I chose this digi stamp from Whoopsi Daisy as I think she looks like the birthday girl. She reminds me of Cinderella going to the ball.

I've used the Cuttlebug Roses folder for the background, and an SU punch for the border.

One of the reasons I love the Copics, is that you can colour anything to match. Apart from the blue paper, everything on this card started as white, and was coloured to match the main image.

The happy birthday (cut at 1.2") is from Create A Critter, and the scalloped oval is from Easter 2010. It was actually a circle doiley, and I resized it into an oval using the Gypsy. The white is cut at 1.6" x 3.2", and the blue at 1.75" x 3.5" after using Hide Contour Feature for the holes.

Happy Birthday Tracey!
I'm submitting this card into the following challenges:
Crafty Creations
Passionately Artistic
Whoopsi Daisy
Creative Inspirations
Ellephantastic Challenges
Till next time,
Luv, Tereesa.
Wednesday, November 3, 2010
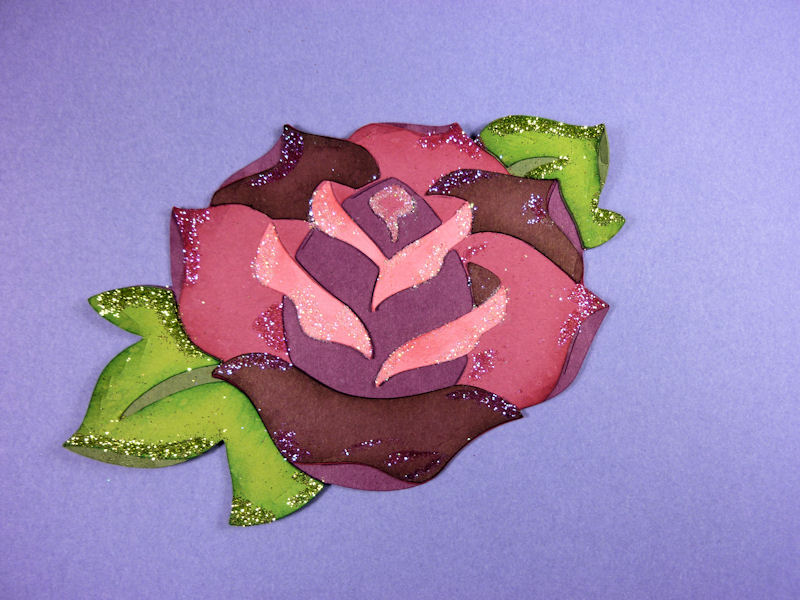
Whip It Up Wednesday's Copics Rose !!
Hi, Today is the first of Scrappy-Go-Lucky's new fortnightly challenge - "Whip It Up Wednesday". For each challenge, held on the first and third Wednesday of each month, you will need to Whip Something Up to meet the criteria of the challenge.
The first challenge: Use colouring in some way to enhance your cricut cuts. Click HERE for all the details.
I enjoy using all the "toys" in my craft room, and try to use a number of them together on projects. Therefore, incorporating my Copics with my Cricut was fun. I decided to try a card using just the base or shadow cut of an image, then colouring with Copics to see what effects could be achieved. This is what I came up with.

This beautiful flower is from "Rock Princess". As you can see below, I cut only the base image (sized at 3 1/2"). I've left the guide cuts to serve as reference points when colouring.

Below is the first layer of colouring. I've used R32 to colour the flower area first.

I've then used R35 / R37 / R59 to bring depth of colour and dimension into the flower. The blender pen is a must-have when using Copics. It literally pushes the ink away. I've used it here to create the dots in the centre to represent the stamens. The leaves are coloured using G17 / G28.

Shimmer paint has been swiped very lightly over the flower, with sections then highlighted with Glaze pens and glitter. I also added a couple of extra leaves around the edge.

Below is the same rose put together with the different layers as normal. I've inked around the edges and added some glitter.

Congratulations to all the winners of the Scrappy-Go-Lucky Blog Hop.
Till next time,
Luv, Tereesa.
The first challenge: Use colouring in some way to enhance your cricut cuts. Click HERE for all the details.
I enjoy using all the "toys" in my craft room, and try to use a number of them together on projects. Therefore, incorporating my Copics with my Cricut was fun. I decided to try a card using just the base or shadow cut of an image, then colouring with Copics to see what effects could be achieved. This is what I came up with.

This beautiful flower is from "Rock Princess". As you can see below, I cut only the base image (sized at 3 1/2"). I've left the guide cuts to serve as reference points when colouring.

Below is the first layer of colouring. I've used R32 to colour the flower area first.

I've then used R35 / R37 / R59 to bring depth of colour and dimension into the flower. The blender pen is a must-have when using Copics. It literally pushes the ink away. I've used it here to create the dots in the centre to represent the stamens. The leaves are coloured using G17 / G28.

Shimmer paint has been swiped very lightly over the flower, with sections then highlighted with Glaze pens and glitter. I also added a couple of extra leaves around the edge.

Below is the same rose put together with the different layers as normal. I've inked around the edges and added some glitter.
Congratulations to all the winners of the Scrappy-Go-Lucky Blog Hop.
Till next time,
Luv, Tereesa.
Monday, November 1, 2010
Kitty's Birthday Bed!
Hi Everyone, A friend of mine recently celebrated her birthday. As she loves cats, this gave me the perfect opportunity to have a closer look at the Lite cartridge "Meow". I think this image is quite cute.

The image and all layers are all cut at 7cm, and the sentiment and papers are from SU.

While the cartridge was out, I decided to make a few more. Here is another easy card using the Craft Concepts embossing folder - Sun Rays - as the background.

The "Queen Cat" and layers were again cut at 7cm. I've inked around the edges of the cat, and lightly stamped over it with some lambswool to give a "furry" look. I kept this card quite plain so it could be used for those male cat-lovers in your life.

One more day to enter the Scrappy-Go-Lucky Blog Hop - don't miss out. Good Luck to everyone.
Till next time,
Luv, Tereesa.
Saturday, October 30, 2010
Moonlit Mermaid - Colouring Techniques
Hi Everyone, How are you all going with the Scrappy-Go-Lucky Blog Hop. Don't forget to leave a comment for your chance to win a Scrapcessories Cartridge Caddy with Insert. You have till 2 November to leave your comments on each post.
Sorry I'm a day late, but as promised, here is a step-by-step tutorial showing how I coloured the lily pads and moonlit lake with the Copics. The only colours used were C1 / C3 / C5 / C7. Below is the image stamped with Memento Black Tuxedo ink.

I started with the C7, and did small feathered brush strokes along the inner edge of the lily pads to about one third of the way out. I always find it easier to have the image facing a way that is comfortable for colouring.

I then used the C5, and did the same - overlapping a little on the C7, and extending it about two thirds out.

Lastly I've used the C3. Starting at the top (at the edge of the C7), and colouring slowly, I use upward strokes pushing and blending the inks as I go to the edge. Try to do these steps straight after each other so the ink stays damp on the cardstock.

Now for the moonlit lake. To achieve this look, I started with C3, and very lightly, using feathered strokes, brushed inwards around the edge of the lake.

Again, using C1 and the feathering technique, I've started at the edge, going over the C3, and extended the strokes so they join in the middle.

Using the 0 Blender Pen, and with the image upside down, I started under the moon and brushed side to side moving upwards to the edge of the C3 near the mermaid. I then did the same again in a narrow line down through the middle.

Lastly, using the C1, I used feather strokes from the outside edge inwards but not quite joining in the middle. This evens up the tones and blends the colours together.

The lake was finished off by adding some ripples on the water with a white Glaze pen.

Mandy now has Copics, inks and blending cardstock all available at Scrappy-Go-Lucky, so CLICK HERE to check out the full range.
I hope this helps you with your colouring endeavours. I would love to hear what you think.
Luv, Tereesa.
Thursday, October 28, 2010
Moonlit Mermaid - Fantasy Blog Hop!
Hi Everyone. Welcome to Up Late 2 Create, and Day 5 in the Scrappy-Go-Lucky Blog Hop. Sadly Mandy left last night after her surprise visit which went all too fast. We've had an amazing few days (and late nights), and I can't wait for the next time we get together.
I hope you're all having fun checking out everyone's "Fantasy" creations. Don't forget, each day until 2nd November, Scrappy-Go-Lucky will be giving away one Scrapcessories Cartridge Caddy with one Cartridge Insert. These are ideal for storing your Cricut cartridges, particularly the solutions and seasonal cartridges. The prize will be posted anywhere in Australia - International blog-hoppers are welcome to enter but will need to pay postage costs.
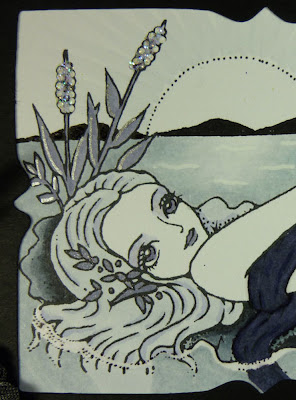
As you are all probably aware, I am totally addicted to my Copics and these Sweet Pea designs, and I enjoyed combining the stamped image with Cricut cuts. Using only the colours "black, white and silver" presented quite a challenge with colouring, but when they were finished, I was quite pleased with the end result. What do you think?

The image used was “Spring Night” by Ching-Chou Kuik, and she was coloured using Copics – C1 / C3 / C5 / C7 / BV23 / BV29 / BV31 / 100 / 0.

To add extra definition to the image, I used black and silver Glaze pens on the tail, and a clear Glaze pen on the moon, the eyes and the water line. I also used a white Glaze pen to define ripples in the lake, and to add dots to the flowers, before sprinkling them with diamond glitter.

The clear Spica glitter pen was used to add a touch of glamour to her eye shadow and to the flowers in her hair (click on the photos to enlarge). The mermaid is then framed in black cardstock. The inner frame is from Storybook sized at 3 ¼” x 2 ¾”, and the outer frame is from George & Basic Shapes sized at 5 ½” x 3 ½” (though it actually didn’t cut at that). I used the Gypsy to line up placement of the frames.
One of the folders from the Cuttlebug Companion set “Art Deco” was used on the left side of the frame. After lining it up in the folder, I placed a rubber shim where I wanted the embossing to stop, then only partially ran it through the cuttlebug machine.
The two willowy reeds were cut from Life’s A Beach – one at 2.3” and one at 2”. These were cut in white, and one coloured with BV23, and one with BV31. I then lightly sponged them with SU shimmer paint in Platinum before adding glitter to the ‘flowers’. These were adhered to a Kaiser silk flower which was also sponged with the Platinum shimmer paint and folded in half.

Some ribbon and a couple of rhinestones were then added to finish.
Make sure you check back in tomorrow as I'll be posting a step-by-step tutorial showing how I coloured the moonlit lake and lily pads.
Now for the important info - to enter to win one of the Scrapcessories Cartridge Caddies, all you need to do is leave a comment on THIS post. One winner will be drawn for each day's major posting. All winners will be drawn at random on Tuesday 2 November.
Head back to Scrappy-Go-Lucky tomorrow to see where to go next.
Good Luck!
Tereesa.
I hope you're all having fun checking out everyone's "Fantasy" creations. Don't forget, each day until 2nd November, Scrappy-Go-Lucky will be giving away one Scrapcessories Cartridge Caddy with one Cartridge Insert. These are ideal for storing your Cricut cartridges, particularly the solutions and seasonal cartridges. The prize will be posted anywhere in Australia - International blog-hoppers are welcome to enter but will need to pay postage costs.
As you are all probably aware, I am totally addicted to my Copics and these Sweet Pea designs, and I enjoyed combining the stamped image with Cricut cuts. Using only the colours "black, white and silver" presented quite a challenge with colouring, but when they were finished, I was quite pleased with the end result. What do you think?

The image used was “Spring Night” by Ching-Chou Kuik, and she was coloured using Copics – C1 / C3 / C5 / C7 / BV23 / BV29 / BV31 / 100 / 0.

To add extra definition to the image, I used black and silver Glaze pens on the tail, and a clear Glaze pen on the moon, the eyes and the water line. I also used a white Glaze pen to define ripples in the lake, and to add dots to the flowers, before sprinkling them with diamond glitter.

The clear Spica glitter pen was used to add a touch of glamour to her eye shadow and to the flowers in her hair (click on the photos to enlarge). The mermaid is then framed in black cardstock. The inner frame is from Storybook sized at 3 ¼” x 2 ¾”, and the outer frame is from George & Basic Shapes sized at 5 ½” x 3 ½” (though it actually didn’t cut at that). I used the Gypsy to line up placement of the frames.

One of the folders from the Cuttlebug Companion set “Art Deco” was used on the left side of the frame. After lining it up in the folder, I placed a rubber shim where I wanted the embossing to stop, then only partially ran it through the cuttlebug machine.
The two willowy reeds were cut from Life’s A Beach – one at 2.3” and one at 2”. These were cut in white, and one coloured with BV23, and one with BV31. I then lightly sponged them with SU shimmer paint in Platinum before adding glitter to the ‘flowers’. These were adhered to a Kaiser silk flower which was also sponged with the Platinum shimmer paint and folded in half.

Some ribbon and a couple of rhinestones were then added to finish.
Make sure you check back in tomorrow as I'll be posting a step-by-step tutorial showing how I coloured the moonlit lake and lily pads.
Now for the important info - to enter to win one of the Scrapcessories Cartridge Caddies, all you need to do is leave a comment on THIS post. One winner will be drawn for each day's major posting. All winners will be drawn at random on Tuesday 2 November.
Head back to Scrappy-Go-Lucky tomorrow to see where to go next.
Good Luck!
Tereesa.
Tuesday, October 26, 2010
Surprise Visit !!
Hi Everyone, I had the most wonderful surprise early this morning. The doorbell rang at some ungodly hour, and as, half-asleep, I opened the door, this lady asked if I was having a garage sale. What a surprise, it was MANDY, all the way from WA. I was completely stunned as I had only been on the phone to her a few hours before.
We had a wonderful day attending the Copics Certification Course here in Brisbane (and plan to have some amazing things to show you in the coming months).

Make sure you check the Scrappy-Go-Lucky blog every day this week. They are having another fun Blog Hop with daily prizes for you to win. Here is a sneak peak of my card which will be posted on Thursday.

Good luck with the Blog Hop!
Luv, Tereesa.
We had a wonderful day attending the Copics Certification Course here in Brisbane (and plan to have some amazing things to show you in the coming months).

Make sure you check the Scrappy-Go-Lucky blog every day this week. They are having another fun Blog Hop with daily prizes for you to win. Here is a sneak peak of my card which will be posted on Thursday.

Luv, Tereesa.
Wednesday, October 20, 2010
H20 Water Fun
Hi, I've been busy catching up with a few neglected chores this week, so I thought today I'd show you a recent project designed for Scrappy-Go-Lucky. I really enjoyed working with the H2O Cartridge and decided to do something a little different with it. My children always enjoyed playing with magnets on the fridge (I think I did too), so I've made a "game" where they can create a multitude of scenes.

The Gypsy isn't needed for this project, but I've used it so I could do a number of cuts in one go. It also makes it easy to work out exactly how much cardstock is required.


Once I added all the layers to the different images, I used all different accessories to add highlights and dimensions. The pool below is cut at 6 1/2" and I've added Crystalina Kindyglitz to the "splashes" on "CannonBall" to look like water droplets. I've also used the Souffle Pens to highlight the edges of the pool and diving board, as well as the waves.

Very little was needed to highlight this. I used a white Souffle Pen on the flag, and highlighted the edges with a deep blue Glaze Pen.

"Mum and Dad" are cut at 4 1/2", and I found the people on this cartridge different to work with. Usually the skin tone is the base image, and the clothing makes the layers - but on H2O, the colour is the base, and the skin tones are the layers. I've used Copic Markers to add highlights to the skin (as you can see the Dad is nicely tanned), and also to colour and highlight the hair, flowers, and shirt; and then Glaze Pens around the swimsuit and bag. I've used a VersaMark Pen to draw the design on the surfboard, and heat embossed it with white powder to make it shine.

These three little munchkins are all cut at 4", and I have again used the Copic Markers and Souffle Pens - (someone's knees are getting burnt).

The ball is cut at 2 1/2" and the sign at 3 1/2". I used a texture to stamp on the post, and the Tim Holtz Woodgrain embossing folder and ink for the sign.

The suncream bottle is sized at 2" with very little added. The sun has crimson glow glitter inside, and diamond glitter on the rays. It's sized at 3 1/2".

This cute bucket is cut at 3", and has been embossed with Cuttlebug Tiny Bubbles, then highlighted with Glaze Pens.

The sandcastle was stamped with a texture, and I've used a glue pen to add sand (lucky I had a beach display in a bottle). It's cut at 3 1/2" and is my favourite image here.

Once I'd finished all the highlighting, I laminated and cut them out. Unfortunately I forgot to take photos before laminating, so a lot of the detail is hard to see. Once laminated I attached some magnetic tape to the back of each image.

Now it's a fun game for toddlers (to keep them amused while mum cooks). Alyssa is having fun modelling below.

Hope you like it.
Luv, Tereesa.
Tuesday, October 19, 2010
Thanks with Lacy Labels
Hi, I wanted to let my friends know how much I appreciate them, so I've made a collection of 'Thank You' cards with the new Lite cartridge "Lacy Labels".
This cut is called "Flower 7" and is sized at 4 1/4". I've used the Gypsy and welded two images together to keep the frame shape. The card has been inked around the edges, and spritzed with Perfect Pearls. I've distressed and glittered the edges of the layered flower, after stamping with a script stamp, then added a button to the centre. The card is embossed with Craft Concepts 'Budding Vine'.

This image is "Buttrfly" and was cut at 3". I've folded the layered butterflies in half to add dimension. Cuttlebug folder used was 'Jules Jewels".

This cut is called "Asian", and is sized at 5". Again the layered flowers were distressed and glittered, and the background embossed with Cuttlebug 'Roses'.

"Flower 1" is the name of this cut, and it's sized at 3 1/4". The tulips on the end have been adhered with foam dots, and glittered around the edge. Cuttlebug 'Swiss Dots' was used on this one.

This image is cut at 3 1/4", and is called "Thnkg You". I've added a cute dragonfly (CM punch), and used Craft Concepts 'Dragonfly' for the background.

This last one is called "Soar" and is cut at 3 1/2". I removed the word soar from the image, and again stamped the layer with a script stamp. The background for this was embossed with Cuttlebug 'Birds & Swirls'.

All these finished cards are about the same size, so this shows how deceiving the cut sizes can be. I hope you like them.
Wow, I've just realised I am over 5,000 visitors to my blog. To celebrate, I'm organizing some blog candy to give away. Check back over the next few days for details. Existing followers at the time of that post will receive double entries, so join now to be in with an extra chance.
Till next time,
Luv,
Tereesa.
Subscribe to:
Posts (Atom)