Hi Everyone. Welcome to Up Late 2 Create, and Day 5 in the Scrappy-Go-Lucky Blog Hop. Sadly Mandy left last night after her surprise visit which went all too fast. We've had an amazing few days (and late nights), and I can't wait for the next time we get together.
I hope you're all having fun checking out everyone's "Fantasy" creations. Don't forget, each day until 2nd November, Scrappy-Go-Lucky will be giving away one Scrapcessories Cartridge Caddy with one Cartridge Insert. These are ideal for storing your Cricut cartridges, particularly the solutions and seasonal cartridges. The prize will be posted anywhere in Australia - International blog-hoppers are welcome to enter but will need to pay postage costs.
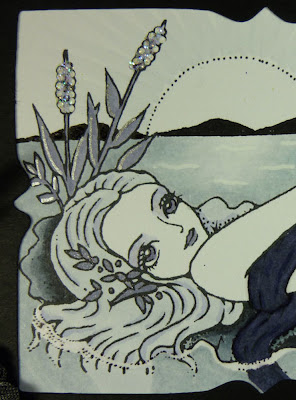
As you are all probably aware, I am totally addicted to my Copics and these Sweet Pea designs, and I enjoyed combining the stamped image with Cricut cuts. Using only the colours "black, white and silver" presented quite a challenge with colouring, but when they were finished, I was quite pleased with the end result. What do you think?
The image used was “Spring Night” by Ching-Chou Kuik, and she was coloured using Copics – C1 / C3 / C5 / C7 / BV23 / BV29 / BV31 / 100 / 0.
To add extra definition to the image, I used black and silver Glaze pens on the tail, and a clear Glaze pen on the moon, the eyes and the water line. I also used a white Glaze pen to define ripples in the lake, and to add dots to the flowers, before sprinkling them with diamond glitter.
The clear Spica glitter pen was used to add a touch of glamour to her eye shadow and to the flowers in her hair (click on the photos to enlarge). The mermaid is then framed in black cardstock. The inner frame is from Storybook sized at 3 ¼” x 2 ¾”, and the outer frame is from George & Basic Shapes sized at 5 ½” x 3 ½” (though it actually didn’t cut at that). I used the Gypsy to line up placement of the frames.
One of the folders from the Cuttlebug Companion set “Art Deco” was used on the left side of the frame. After lining it up in the folder, I placed a rubber shim where I wanted the embossing to stop, then only partially ran it through the cuttlebug machine.
The two willowy reeds were cut from Life’s A Beach – one at 2.3” and one at 2”. These were cut in white, and one coloured with BV23, and one with BV31. I then lightly sponged them with SU shimmer paint in Platinum before adding glitter to the ‘flowers’. These were adhered to a Kaiser silk flower which was also sponged with the Platinum shimmer paint and folded in half.
Some ribbon and a couple of rhinestones were then added to finish.
Make sure you check back in tomorrow as I'll be posting a step-by-step tutorial showing how I coloured the moonlit lake and lily pads.
Now for the important info - to enter to win one of the Scrapcessories Cartridge Caddies, all you need to do is leave a comment on THIS post. One winner will be drawn for each day's major posting. All winners will be drawn at random on Tuesday 2 November.
Head back to Scrappy-Go-Lucky tomorrow to see where to go next.
Good Luck!
Tereesa.
Showing posts with label Competitions. Show all posts
Showing posts with label Competitions. Show all posts
Thursday, October 28, 2010
Tuesday, October 26, 2010
Surprise Visit !!
Hi Everyone, I had the most wonderful surprise early this morning. The doorbell rang at some ungodly hour, and as, half-asleep, I opened the door, this lady asked if I was having a garage sale. What a surprise, it was MANDY, all the way from WA. I was completely stunned as I had only been on the phone to her a few hours before.
We had a wonderful day attending the Copics Certification Course here in Brisbane (and plan to have some amazing things to show you in the coming months).
Make sure you check the Scrappy-Go-Lucky blog every day this week. They are having another fun Blog Hop with daily prizes for you to win. Here is a sneak peak of my card which will be posted on Thursday.
Good luck with the Blog Hop!
Luv, Tereesa.
We had a wonderful day attending the Copics Certification Course here in Brisbane (and plan to have some amazing things to show you in the coming months).
Make sure you check the Scrappy-Go-Lucky blog every day this week. They are having another fun Blog Hop with daily prizes for you to win. Here is a sneak peak of my card which will be posted on Thursday.
Luv, Tereesa.
Friday, August 13, 2010
By The Silvery Moon
Hi Everyone - and Welcome to Day 5 of the Scrappy-Go-Lucky Blog Hop. Remember, the colour scheme is black, white and silver - but what is the theme ???
This is the card I made using the "Summer Vacation" cartridge.
Haved you guessed the theme yet - For all the details on how to win one of the four new cartridges:-
head on over to This Post at Scrappy-Go-Lucky, and leave a comment with your answers.
Good Luck.....
Luv, Tereesa.
This is the card I made using the "Summer Vacation" cartridge.
To achieve this background of a beautiful, shimmery moon, I started with a piece of Glossy white cardstock.
Using some sponges, I covered the whole sheet with a very pale gray ink.
I then attached a 1 1/4" circle with some repositional adhesvie, and sponged it again with the pale gray.
Moving out a little from the circle, I sponged with a darker gray.
Then moving out further again, used the darker gray for a second time.
Lastly, I sponged the edges with black ....
Finally removing the circle.
To finish up the background, I then used the edge of the sponge to add a few shimmery silver clouds (they don't show up very good in the photo). This technique also works well with different colours - yellows into oranges, and blues into purples.
The silhouette of the girl is from "A Childs Year", cut at 1 1/4". The tent is from "Summer Vacation" and is cut at 1 1/2", then highlighted with a silver gel pen. I have adhered the cut-outs from the tent flat to the card, but the main tent image is mounted on foam dots to add shadowing and dimension.
The tropical palm trees are also from "Summer Vacation", cut at 2 1/2" and 3", and again highlighted with a silver gel pen. The smaller tree is adhered flat to the card, and the larger one with foam dots.
There are numerous grass images from Gypsy Wanderings ranging in size from .3" to .45". Using the Gypsy, these have been welded together from largest to smallest, and adhered in layers of two and three.
Haved you guessed the theme yet - For all the details on how to win one of the four new cartridges:-
Rock Princess
Winter Frolic
Country Life
Happy Hauntings
head on over to This Post at Scrappy-Go-Lucky, and leave a comment with your answers.
Good Luck.....
Luv, Tereesa.
Tuesday, August 10, 2010
Scrappy-Go-Lucky Blog Hop
Hi Everyone, Today is the first day of another fun Blog Hop with Mandy. Head over to Scrappy-Go-Lucky for all the details - then each day one designer will show you their creation. You have a chance to win one of the four new cartridges -
Monday - Mandy @ Scrappy-Go-Lucky
Tuesday -Jane @ Scossie Jane
Wednesday - Diane @ Capadia Designs
Thursday - Chloe @ Chloe and her Clip On Koalas
Friday - Tereesa @ Up Late 2 Create
Saturday - Amanda @ White Ruffles
Sunday - Tracey @ Trace-Elementz
Monday - Lisa and Tara - back at SGL as they don't have blogs ...... yet
Here's a sneak peak at mine ....
Rock Princess
Winter Frolic
Country Life
Happy Hauntings
Monday - Mandy @ Scrappy-Go-Lucky
Tuesday -Jane @ Scossie Jane
Wednesday - Diane @ Capadia Designs
Thursday - Chloe @ Chloe and her Clip On Koalas
Friday - Tereesa @ Up Late 2 Create
Saturday - Amanda @ White Ruffles
Sunday - Tracey @ Trace-Elementz
Monday - Lisa and Tara - back at SGL as they don't have blogs ...... yet
Here's a sneak peak at mine ....
Till tomorrow,
Luv, Tereesa.
Saturday, June 19, 2010
Blog Hop Winner
Hi Everyone. Today's the day. The Blog Hop is over and the winners chosen. Random Org was used to choose the winner of a set of 10 Cri-Kits Gel pens - and the lucky winner was...
Congratulations Char J. Please email me your address and choice of Cri-Kits set, and we will get these in the post to you.
Now for those of you wondering, the number of "cut" sea creatures in my Tropical Paradise is 16. There are 4 fish, 1 seahorse, 2 jelly-fish, 1 octopus, 1 crab, and 7 oysters. I hope you had fun counting them.
Thanks to everyone for participating int the "Round The World With Cri-Kits" blog hop.
Have a great weekend.
Luv, Tereesa.
Char J
with this comment..."what a great project--it is lovely. i know i couldn't ever do this--to delicate--fingers not nimble anymore. put me down for 19 little guys. great job... "
Congratulations Char J. Please email me your address and choice of Cri-Kits set, and we will get these in the post to you.
Now for those of you wondering, the number of "cut" sea creatures in my Tropical Paradise is 16. There are 4 fish, 1 seahorse, 2 jelly-fish, 1 octopus, 1 crab, and 7 oysters. I hope you had fun counting them.
Thanks to everyone for participating int the "Round The World With Cri-Kits" blog hop.
Have a great weekend.
Luv, Tereesa.
Friday, June 11, 2010
Tropical Paradise
Hi Everyone, and Welcome to Day 5 of our "Round the World With Cri-Kits" Scrappy-Go-Lucky Blog Hop. I hope you are all checking in daily to pick up the clues.
I too, live in Brisbane in sunny Queensland, and my absolutely favourite place to be is on Hamilton Island on the Great Barrier Reef. You can literally walk out your front door and snorkel to see beautiful fish and colourful coral all around you. It is like being in another world - and I wanted to recreate that amazing experience with a 3D Tropical Fish Tank.
The Gypsy was a must for this design - I used 15 layers. The first was to cut the front panel of the tank at 11 1/4", the 12x24 mat was needed for this. Unfortunately I couldn't find an acetate sheet large enough, so I have used an A3 Document Protector. The second step was to draw the star-fish and bubbles with the Cri-Kits gel pens. I then coloured these in with Glaze pens to give a stained-glass effect (you can still see the smiling faces on the star-fish).
The same steps were applied for the back panel, but I only went over the top part of the sea-grass with the glaze pens. The clear plastic is very hard to photograph, and unfortunately it hasn't shown the gel-pens on this piece.
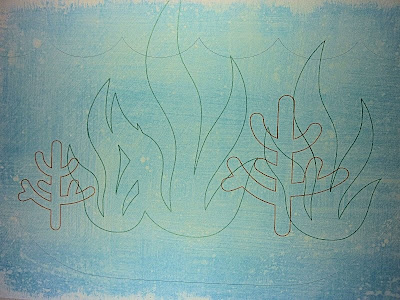
The first layer of the tank is the "water". I used the Cri-Kits gel pens to draw the outline of the coral in "Glitter Orange", and the sea-grasses in "Metallic Dark Green".
The image was then cut.
The same process was used for the "sand" layer and I used Cri-Kits "Pastel Mauve" for the starfish, "Glitter Gold" for the shells, "Metallic Green" for the seaweed, and "Glitter Dark Silver" for the stones.
A close-up to show you the beautiful colouring of the Cri-Kits.
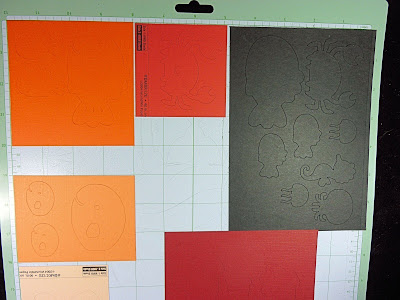
To save constantly reloading the mat, I lined up the images on the Gypsy, worked out the sizing, and cut everything at once.
The sea-grasses and coral were cut smaller than the Cri-Kits drawings to give more dimension. The sea-grasses were embossed using Cuttlebug "D'vine Swirl", and the coral with "Rellie Rave" - and of course, plenty of glitter was added to emulate sparkling sun through the water.
Thought you might like to see a shot of the creatures as they came to life. Different parts of these were embossed with Swiss Dots, Tiny Bubbles, Textile, Perfectly Paisley, and Candy Cane Stipe. The fish are layered on both sides so they can "swim" freely.
I chose random sections of each creature to highlight with glossy accents, then sprinkled each lightly with diamond glitter.
The back section is coming together ...... Each of the creatures have been attached using different sized foam dots to add a multitude of dimensions. I love the sea-horse with his tail around the coral.
To make this stand up, I cut a piece of acetate and folded it (like a fan) till the desired length was reached as shown below.
I then took the remainder and adhered it to the back.
Acetate was again used to keep the top separated. This piece is sized at 10" x 4 3/4", scored at 1 3/8" on each side. I attached the sides to the top of the tank with large silver brads, and cut around the lip of the tank making the piece invisible.
After working out placement, holes were pierced in the "base" of this top piece. Fishing line was affixed to the middle of the fish as I was glueing the layers, which is now threaded through the top piece allowing the fish to "swim".
A couple of close-ups of the cute little critters... (you may need these photos - you'll see why soon!!!)
I adhered some oyster shells over the base piece to hide the folds. You can also notice the Cri-Kits on the "sand" layer adding some extra colour and dimension.
A photo showing the side view...
And one from the top.
Here I have placed it beside a Cricut Cartridge to give an idea of the true size.
My "Tropical Paradise" in its new home.
Now for the fun part. To win these awesome Cri-Kits Gel Pens (a set of 10 - your choice - plus holder if needed), all you need to do is count how many "sea creatures" have been used in this project. As some of the photos haven't shown the ones drawn with the Cri-Kits very well (my bad photography) - it is only the creatures "cut" with the Cricut. To enter, leave your answer with a comment, and Random.org will choose the winner on Friday June 18.
Don't worry - right or wrong - all comments have a chance to win. (Be sure to leave a way for me to contact you if your comment is chosen.) If you're not already a follower, I'd love to have you join, but it is not required to enter.
And don't forget the major prize - Mandy is giving away the four new-release cartridges -
Cindy Lou / Freshly Picked / Mini Monster / Wall Decor & More
Here's how:-
You need to follow this international Blog Hop and collect the clues. Once you have solved the anagram you need to e-mail the answer to Mandy at:
by Friday 18th June when the lucky winner will be drawn at random.....
Here is my clue.....
Don't forget to check in with Enfys tomorrow to check out her amazing design and to collect the next clue.
Good Luck!
Luv, Tereesa.
Monday, June 7, 2010
Spongebob PinkPants
Hi, Would you like the chance to win the four latest release Cricut cartridges:
Cindy Lou / Freshly Picked
Wall Decor & More / Mini Monsters
If so, join in the "Round The World With Cri-Kits" Blog Hop starting today with Scrappy-Go-Lucky. There will be a hidden clue each day with one of the Design Team Members. Each day, one of the Design Team will also be giving away a set of 10 Cri-Kits gel pens. Check out all the details here.
Good Luck !!
Now, having 3 kids who love watching Spongebob Squarepants, I have sort of become a fan (but don't tell anybody!!). As yellow is not one of my favourite colours, I changed him, and made this "Spongebob PinkPants" to hang on the wall in the "Pink Room".
I decided to modify him further, and for Christmas last year made these cute snow-globe cards for my children. This one is dancing Spongebob PurplePants for my daughter, Alyssa.
After embossing with the Swiss Dots Cuttlebug folder, I put white gel pen and glitter on each dot to represent falling snow.
Meet Spongebob RedPants for Josh. This was a little different as I attached it to a card base.
This is Spongebob Greenpants who is doing Parkour (Chris' favourite past-time).
Thanks for checking in.
Till next time.
Luv, Tereesa.
Subscribe to:
Posts (Atom)


