Hi Everyone. Welcome to Up Late 2 Create, and Day 5 in the Scrappy-Go-Lucky Blog Hop. Sadly Mandy left last night after her surprise visit which went all too fast. We've had an amazing few days (and late nights), and I can't wait for the next time we get together.
I hope you're all having fun checking out everyone's "Fantasy" creations. Don't forget, each day until 2nd November, Scrappy-Go-Lucky will be giving away one Scrapcessories Cartridge Caddy with one Cartridge Insert. These are ideal for storing your Cricut cartridges, particularly the solutions and seasonal cartridges. The prize will be posted anywhere in Australia - International blog-hoppers are welcome to enter but will need to pay postage costs.
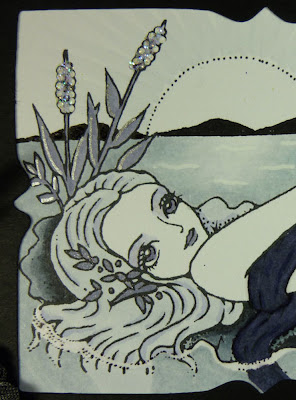
As you are all probably aware, I am totally addicted to my Copics and these Sweet Pea designs, and I enjoyed combining the stamped image with Cricut cuts. Using only the colours "black, white and silver" presented quite a challenge with colouring, but when they were finished, I was quite pleased with the end result. What do you think?
The image used was “Spring Night” by Ching-Chou Kuik, and she was coloured using Copics – C1 / C3 / C5 / C7 / BV23 / BV29 / BV31 / 100 / 0.
To add extra definition to the image, I used black and silver Glaze pens on the tail, and a clear Glaze pen on the moon, the eyes and the water line. I also used a white Glaze pen to define ripples in the lake, and to add dots to the flowers, before sprinkling them with diamond glitter.
The clear Spica glitter pen was used to add a touch of glamour to her eye shadow and to the flowers in her hair (click on the photos to enlarge). The mermaid is then framed in black cardstock. The inner frame is from Storybook sized at 3 ¼” x 2 ¾”, and the outer frame is from George & Basic Shapes sized at 5 ½” x 3 ½” (though it actually didn’t cut at that). I used the Gypsy to line up placement of the frames.
One of the folders from the Cuttlebug Companion set “Art Deco” was used on the left side of the frame. After lining it up in the folder, I placed a rubber shim where I wanted the embossing to stop, then only partially ran it through the cuttlebug machine.
The two willowy reeds were cut from Life’s A Beach – one at 2.3” and one at 2”. These were cut in white, and one coloured with BV23, and one with BV31. I then lightly sponged them with SU shimmer paint in Platinum before adding glitter to the ‘flowers’. These were adhered to a Kaiser silk flower which was also sponged with the Platinum shimmer paint and folded in half.
Some ribbon and a couple of rhinestones were then added to finish.
Make sure you check back in tomorrow as I'll be posting a step-by-step tutorial showing how I coloured the moonlit lake and lily pads.
Now for the important info - to enter to win one of the Scrapcessories Cartridge Caddies, all you need to do is leave a comment on THIS post. One winner will be drawn for each day's major posting. All winners will be drawn at random on Tuesday 2 November.
Head back to Scrappy-Go-Lucky tomorrow to see where to go next.
Good Luck!
Tereesa.


Such a gorgeous card Tereesa. The black, silver & white look stunning.
ReplyDeleteThis is just stunning love the extra BLING and where did you get the "storybook" from.
ReplyDeleteCheers
tereesa....i am in love with your fairies. have you ever thought of selling them?
ReplyDeleteThis is just gorgeous!
ReplyDeleteShelley, Storybook is a Cricut cartridge :-)
ReplyDeletewow!! i would never of thought to use the storybook cartridge like that!! so stunning!!
ReplyDeleteThis is beautiful. I would really love to learn how to use gel, glitter and glaze pens. They always seem harsh when I use them, I guess I need to learn to blend. If you ever do a full tutorial on the pens, let me know, you have my email because I get your updates. I love the Sweet Pea images. tfs
ReplyDeleteWow this is an amazing card!Love seeing all the uses of the cartridges.
ReplyDeleteLinda
http://cardsbylinda.blogspot.com
This card is just amazing!! such wonderful work!
ReplyDeletejendewar@optusnet.com.au
I would love to see this one IRL it looks gorgeous. (I bet you stayed up all of the nights talking) How was your Copic course, wish i was there with you.
ReplyDeletexx
Beautiful card, your colouring is stunning and I am sure this will look amazing in a frame. The stickles and glaze emphasize really well.
ReplyDeleteKim xXx
I am so glad I was able to be part of this card swap. I recived your card in the mail the other day and I just love the mermaid! The coloring on it is perfect, and I really loved the glimpse of how you did it on your blog. I have been wanting to get into using copics, and now I really want to give it a try! Thanks for the beautiful card!
ReplyDelete